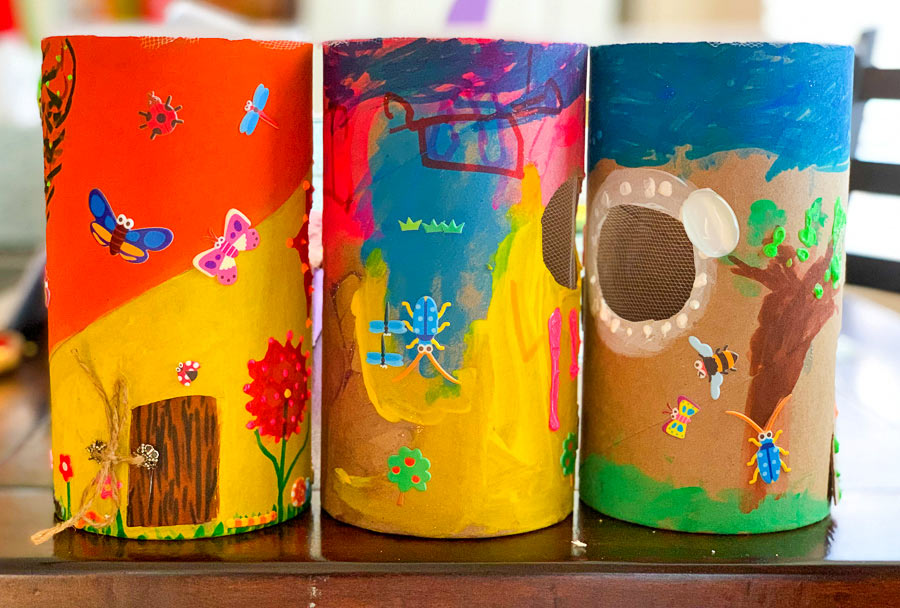
How can you paint a bug hotel? Yes, you can paint a bug hotel. You will need to use waterproof paint and make sure that the paint does not contain any toxins that could harm the insects.
Unlock Your Creativity: Painting Techniques For Bug Hotels
Painting a bug hotel involves more than just aesthetics; it’s about creating a welcoming and safe environment for insects. Here are some painting techniques and tips to consider:
Choose the Right Paints:
- Non-Toxic and Natural: Always use non-toxic, water-based paints. These are safer for insects and the environment.
- UV-Resistant Paints: If available, choose UV-resistant paints to ensure the colors last longer under sun exposure.
Preparation:
- Clean the Surface: Make sure the bug hotel is clean and dry. Remove any dirt or debris.
- Priming (Optional): If your bug hotel is made from materials like untreated wood, you might want to apply a non-toxic primer to help the paint adhere better.
Color Choices:
- Earthy Tones: Opt for colors that mimic nature, like greens, browns, and grays. These tones are more likely to attract insects.
- Bright Accents: While predominantly using natural tones, you can add small bright accents to make the hotel more visually appealing.
Painting Techniques:
- Layering: Start with lighter colors as a base and add darker shades in layers. This can create depth and mimic natural textures.
- Sponging or Rag Rolling: These techniques can give a textured look, making the hotel blend in more with natural surroundings.
- Stenciling: Use stencils for patterns like leaves, flowers, or geometric shapes to add interest.
Avoid Painting Interior Spaces:
- It’s crucial to keep the interior natural. Insects prefer and are safer in untreated, natural materials.
Sealing the Paint:
- After the paint dries, apply a non-toxic sealant. This step is essential to protect the paint from weather and extend the longevity of the bug hotel.
Safety Considerations:
- Work in a ventilated space and use gloves if necessary. If children are involved, supervise them and ensure they use safe materials.
Creative Touches:
- Textures: Add textures by attaching natural elements like bark or leaves after painting.
- Personalization: Personalize the bug hotel with names or designs that reflect the surrounding garden.
Regular Maintenance:
- Check the paint annually. You might need to touch up areas that have chipped or faded to maintain the look and protection of the bug hotel.
Remember, the main goal is to create a hospitable environment for insects, so while creativity is encouraged, the well-being of the hotel’s tiny guests should always be the priority.
Bug Hotel: How to Make a Home for Beneficial Insects
- Research what types of bugs you want to attract to your bug hotel
- Choose a location for your bug hotel that will be safe from the elements and predators
- Gather materials that can be used to create different sized cavities and chambers for your bugs, such as bamboo tubes, sticks, stones, bark, leaves, and soil
- Using a saw or knife, cut the materials into pieces that will fit together to create a sturdy structure
- Assemble the pieces of your bug hotel, leaving some openings for entrance and exit points
- Pack the crevices of your bug hotel with dried leaves or grass for insulation and fill any remaining space with soil
- Water the soil so it is damp but not soaked , then place your bug hotel in its desired location
What to Put in a Bug Hotel
If you’re looking to provide a home for some local wildlife, a bug hotel is the perfect solution! Bug hotels are simple structures that offer shelter and food for all sorts of insects, from bees and beetles to spiders and woodlice. Plus, they’re easy and fun to build!
Here’s what you’ll need to get started:
– A selection of different sized containers, such as recycled plastic bottles, cardboard tubes or bamboo canes. Make sure there are plenty of holes punched in the sides or bottoms of the containers for ventilation.
– A variety of natural materials for your bugs to nest in, such as straw, moss, twigs, bark chips or dead leaves. Avoid using anything treated with chemicals like pesticides.
– A location for your bug hotel that gets some sun during the day but is sheltered from strong winds.
Once you’ve gathered all your materials, it’s time to start building! Simply stack the containers on top of each other, fill them with nesting material and voila – your bug hotel is complete! Now all you need to do is wait for your new residents to move in.
How to Make a Bug Hotel for Kids
Insects are amazing creatures that play an important role in our ecosystem. They help pollinate plants, decompose organic matter and provide food for other animals. Many kids are fascinated by insects and enjoy observing them up close.
A great way to encourage this interest is to build a bug hotel for kids! A bug hotel is simply a structure that provides shelter and resources for insects. It can be as simple or elaborate as you like, but should include a few key features:
-A variety of different sized holes or tunnels for different types of insects to use as homes. You can create these using hollowed out sticks, rolled up paper tubes, bamboo sections, etc.
-A safe location away from pesticides or herbicides. Choose a spot in your yard that gets some sun and some shade throughout the day.
-Access to water. A small dish of water placed near the bug hotel will give thirsty insects a place to drink and bathe.
Building a bug hotel is a fun activity for kids of all ages – they can help gather materials, construct the hotel itself, and then observe the insects that move in!
How to Make a Bug Hotel from a Plastic Bottle
If you’re looking for a fun, eco-friendly project to do with your kids (or on your own), why not try making a bug hotel out of a recycled plastic bottle? It’s a great way to upcycle an old bottle and provide a safe place for beneficial insects like bees, ladybugs, and lacewings to stay. Plus, it’s super easy to make!
Here’s what you’ll need:
1 recycled plastic bottle (any size will work) A sharp knife or box cutter
Masking tape or duct tape Scissors Instructions:
1. Using your knife or box cutter, carefully cut the top off of the plastic bottle. Make sure the opening is big enough for bugs to enter.
2. Next, use the scissors to make small cuts all around the bottom of the bottle.
These will be the “rooms” for your guests.
3. Once all of the cuts are made, turn the bottle over and use tape to secure the bottom. This will keep everything in place once you start filling it up.
4. Now it’s time to get creative! Use whatever materials you have on hand to fill up each “room” in your bug hotel. Some good options include sticks, leaves, pine cones, stones, and pieces of wood.
Get creative and have fun with it!
5 . When you’re finished filling up each room , put the top back on your bug hotel (secure with tape if necessary) and find a nice spot outside for it . Your new guests should be moving in soon!
How to Attract Insects to Insect Hotel
If you want to attract insects to your insect hotel, there are a few things you can do. First, make sure the hotel is in a sunny spot. Insects need warmth to survive, so they’ll be more likely to stay in a hotel that’s in a sunnier location.
Secondly, include a variety of materials in your hotel. Different insects like different materials, so by providing a variety, you’ll be more likely to attract a wider range of insects. Finally, don’t forget to include food for the insects!
Many insects feed on nectar or pollen, so including flowers or other plants near your insect hotel will help bring them in.
How to Make a Bug Hotel from a Pallet
If you’re looking for a fun and eco-friendly way to make your garden more inviting for pollinators, look no further than a bug hotel made from a pallet! Not only will this provide shelter and homes for beneficial insects, but it’s also a great way to upcycle an old pallet that would otherwise end up in a landfill. Here’s how to do it:
1. Start by dismantling the pallet into individual boards. If the boards are particularly rough, you may want to sand them down before proceeding.
2. Next, cut the boards into pieces of varying lengths – these will form the different “rooms” of your bug hotel.
3. Once all of your pieces are cut, it’s time to start assembling the hotel! To do this, simply nail or screw the pieces together into whatever design you like. Just be sure to leave some gaps in between the boards for insects to enter and exit.
4. When your bug hotel is complete, find a spot for it in your garden and fill it with materials that insects will love such as bark chips, straw, leaves, and small stones. That’s all there is to it! With just a bit of effort, you can create a lovely home for pollinators while also doing your part to reduce waste.

Credit: www.craftylittlegnome.com
Can I Paint My Bee Hotel?
Yes, you can paint your bee hotel. However, it is important to use a non-toxic paint that will not harm the bees. You can also seal the bee hotel with a clear sealant to protect it from the weather.
How Do You Paint a Bug House?
When most people think of painting, they usually envision a can of paint and a brush. But when it comes to painting a bug house, there is much more to it than that! Here are the steps you need to take to properly paint a bug house:
1. Choose the right type of paint. The kind of paint you use is very important when painting a bug house. You want to use an exterior-grade acrylic latex paint so that it will be durable and long lasting. Make sure to avoid using any oil-based paints as these can be harmful to bugs.
2. Prepare the surface. Before you start painting, you need to make-sure that the surface is clean and free of debris. You can do this by power washing or sanding down the surface beforehand. This will help the paint adhere better and also create a smooth finish.
3. Prime the surface. Once the surface is prepped, you’ll want to apply a primer coat before painting. This will help seal any porous surfaces and provide a good base for your paint job. Be sure to let the primer dry completely before moving on to step four!
4., Paint away! Now it’s time for the fun part – painting! Be sure to use even strokes and follow all directions on your chosen paint can carefully.
It’s always best to apply two coats of paint for optimal coverage and protection against weathering elements like sun and rain damage.. And that’s it!
Do Bugs Actually Use Bug Hotels?
Yes, bugs actually do use bug hotels! These special hotels are made up of a variety of materials that provide shelter and food for different types of insects. Many people build bug hotels to help support local pollinators and other beneficial insects.
While some commercial bug hotels can be quite expensive, it is also possible to make your own simple hotel using recycled materials.
What are the Best Materials for a Bug Hotel?
There are a lot of different materials you can use to build a bug hotel, but some are better than others. Here are a few of the best materials to use:
1. Bamboo – Bamboo is an excellent material for a bug hotel because it is strong and durable. It also has a lot of nooks and crannies for bugs to hide in.
2. Cardboard – Cardboard is another good material to use because it is cheap and easy to find. Bugs can easily burrow into cardboard, making it the perfect home for them.
3. Wood – Wood is another great material for a bug hotel because it is sturdy and long-lasting. Bugs can easily make their homes in the cracks and crevices of wood, making it ideal for them.
4. Stone – Stone is an excellent material to use for a bug hotel because it is natural and will last for many years.
FAQs Of How Can You Paint A Bug Hotel!
What Type of Paint Should I Use?
Use water-based, non-toxic paint. It’s important to choose paints that are safe for insects and the environment. Avoid paints with strong chemicals or odors.
Do I Need to Prepare the Surface Before Painting?
Yes, it’s advisable to clean the surface of the bug hotel. Remove any dirt or debris and ensure the surface is dry before painting.
What Colors Are Best for a Bug Hotel?
Natural, earthy tones are recommended as they blend in with the environment and are more appealing to insects. Bright colors can be used, but sparingly.
Can I Paint the Inside of the Bug Hotel?
It’s best to avoid painting the inside. The natural materials inside the bug hotel are more attractive to insects and safer for them.
How Many Coats of Paint Should I Apply?
Usually, one or two coats are sufficient. Make sure the first coat is completely dry before applying the second.
Is It Necessary to Seal the Paint?
It’s a good idea to use a non-toxic sealant to protect the paint from weather conditions and to extend the life of your bug hotel.
How Long Should I Wait Before Placing the Bug Hotel Outside?
Allow the paint and sealant to dry completely, which might take a couple of days, before placing the bug hotel outdoors.
Are There Any Designs or Patterns I Should Consider?
While designs are not necessary, you can get creative with patterns or motifs that blend with your garden. Avoid intricate designs inside the hotel.
What Safety Precautions Should I Take While Painting?
Work in a well-ventilated area, wear protective clothing if needed, and keep the paint away from children and pets.
Can I Involve Children in the Painting Process?
Absolutely! Painting a bug hotel can be a great educational activity for children. Just ensure they use safe paints and are supervised.
Conclusion
Yes, you can paint a bug hotel! All you need is some paint and a few supplies. First, gather your supplies.
You will need: a bug hotel (you can purchase one or make your own), paint, brushes, and other decorations (optional). Next, decide what colors you want to use. Once you have chosen your colors, begin painting the outside of the bug hotel.
Be sure to cover all sides evenly. If you are adding any other decorations, now is the time to do so. Allow the bug hotel to dry completely before filling it with bugs!

“My name is Leo Jacob, and I hold a Bachelor of Science degree with Honors in Applied Environmental Science and Sustainability from the University of the West of Scotland. Since childhood, I’ve been passionate about living an eco-friendly life. After completing my studies, I dedicated myself to finding simple ways to lead a more environmentally conscious lifestyle. I launched ecolifely.com to share my educational background and practical experiences with everyone, hoping to inspire others to join me in creating a greener, more sustainable world.”

